
The standard 4-room BTO layout, with its defined living room box, practically dictates where a display cabinet can go — it’s typically against the wall opposite the sofa, flanked by bedroom doors. That placement becomes a focal point, but it’s also a traffic corridor; you’ll want a shallower cabinet, perhaps 35 to 40 centimetres deep, to avoid elbows and shoulders constantly brushing past precious ceramics. The real constraint, however, is vertical. Most HDB living rooms have a structural beam running across the ceiling, often around 2.4 metres high, and your cabinet simply can’t breach it. You’re working within a 2.1 to 2.3 metre height envelope, which makes a tall, statement display unit a physical impossibility in many homes.
Open-plan condo living areas flip that script entirely. Without walls boxing the space, a display cabinet often serves as a subtle room divider, separating the lounge zone from a dining area or study nook. Here, you can consider a double-sided or glass-panelled design that doesn’t block light. The scale can be more generous, too; floor-to-ceiling glazing on one side provides a lofty backdrop for a taller unit, assuming your condo’s ceiling clearance allows it. This freedom invites a different approach — the cabinet becomes a sculptural element in the round, not just a flat against a wall.
Landed property hallways present a distinct, often overlooked opportunity. That long entrance hall in a terrace house isn’t just a passage; it’s a gallery. The extended wall space and higher ceilings, sometimes reaching 3 metres or more, let you install a succession of low console-style cabinets or a truly monumental floor-to-ceiling piece. It’s a chance to create a curated procession of objects, something that simply wouldn’t fit in the tighter confines of an HDB common corridor.
Ultimately, your building’s architecture writes the first draft of your display cabinet plan. A buyer wants storage and display, but the beam positions, window placements, and circulation paths of their specific home typology will edit those desires down to a very short list of workable options. You’ll find that a broad selection of solutions tailored to these common spatial challenges exists, from shallow-depth BTO-friendly units to room-dividing glass cabinets, all within the living room furniture category.
That glass-fronted cabinet might look pristine in the showroom, but Singapore’s climate and a boisterous terrier have a way of revealing a material’s true character in under a year. For display cabinets in our 80% humidity, the core decision often narrows to solid wood versus engineered wood with a serious moisture-resistant finish. Solid teak or rubberwood offers inherent stability, but it’s a premium choice; you’re paying for that natural resilience, and even then, dramatic shifts in humidity can still cause subtle warping over time. Engineered wood with a high-pressure laminate or proper lacquered seal can be a more consistent performer — the layered construction resists expansion, and a good factory-applied polyurethane topcoat locks out moisture effectively, though you’ll want to check the edges and backing for any unfinished seams.
Laminates aren’t just for moisture; they’re your first line of defence against a cat’s claws or a dog’s enthusiastic tail. A textured, matte laminate in a woodgrain or solid colour can hide minor scuffs beautifully, and it’s remarkably easy to wipe down after a rainy-day walk. For the cabinet doors and shelves, tempered glass is non-negotiable for safety — it crumbles into small, dull granules instead of shattering into jagged shards, a crucial detail in a household with curious children or pets that might bump against it.
One material to scrutinise carefully is MDF. It’s a budget-friendly workhorse for many furniture pieces, but in a high-humidity zone like a non-air-conditioned living room near a kitchen or bathroom, it’s a liability without exceptional sealing on every single surface. Even then, any chip or scratch that breaches the seal can let moisture wick into the core, leading to swelling that’s impossible to reverse. It’s often better to allocate budget toward a simpler design in a more suitable material than to gamble on an ornate MDF piece that won’t last the decade.
For the plinth or legs of a floor-standing unit, consider metal or plastic feet to elevate it slightly off damp floors, especially in landed properties or ground-floor units. And while glossy acrylic finishes look striking, they show every single paw print and dust streak — a satin or matte finish will forgive far more in a busy household. The right combination, like a laminated body with tempered glass and metal hardware, creates a piece that endures the environment so your collectibles inside remain the focus.
Buyers often assume a 12 sqm HDB living room has more wall space than it truly does. They'll plan for a full-height display cabinet only to find it collides with the main door's swing radius or blocks a window's light source. That clearance isn't a minor detail — it's the difference between a functional floor plan and a permanent obstacle. Measuring the actual free wall length, from door frame to window sill, is a non-negotiable first step. Ignoring it means you'll either have to return a unit or live with a door that can't open fully.
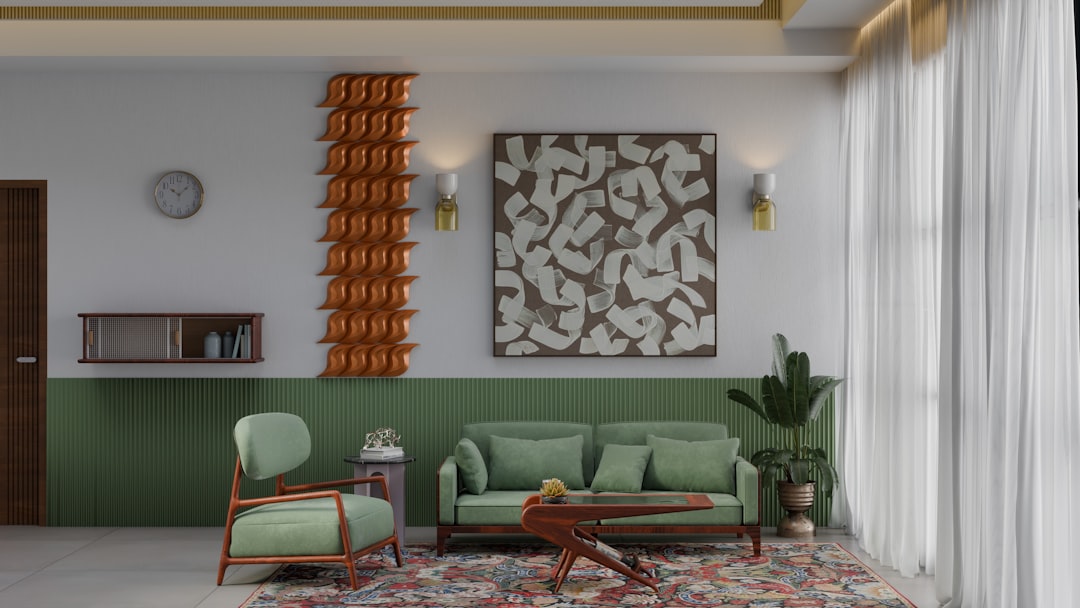
A common instinct is to choose a single, dark-toned cabinet for a cohesive look, but that creates a visually heavy block in a compact space. In many BTO flats, a charcoal or espresso unit can make the room feel like it's closing in. Lighter finishes or mixed-material designs — think oak with glass panels — break up the mass. They reflect more light around the room, which is crucial in window-limited layouts common in older HDB blocks. It's a simple trick that prevents your largest storage piece from dominating the entire area.
This mistake is painfully literal: purchasing a cabinet without accounting for how nearby doors open. In a typical 4-room flat, the main door, balcony door, and bedroom doors all converge on the living area. A cabinet placed too close to any of them will either get scuffed or restrict access. The fix is to map the swing arcs with masking tape on the floor before you shop. That visual guide shows you the real estate you're actually working with, not the optimistic rectangle you imagined.
Integrated lighting is too often an afterthought, considered only after the cabinet is installed and the room feels cavernous. Planning for LED strips or puck lights during the purchase phase lets you route wires neatly and choose models with built-in channels. Without that foresight, you're left with trailing extension cords or the harsh glare of a single ceiling spotlight. Good display lighting transforms a unit from a dark box into a focal point, highlighting decor instead of swallowing it. It's a functional element that doubles as your evening ambient glow.
People frequently select a cabinet that's proportionally wrong for the room's volume. A tall, deep unit in a low-ceilinged corridor flat can feel oppressive, like the walls are leaning in. The better approach is to match the cabinet's proportions to the room's — lower, longer profiles for narrow spaces, or vertical units that draw the eye up in rooms with higher ceilings. It's not just about fitting the piece in; it's about how the piece makes the room feel once it's there. That feeling of spaciousness is what you're actually buying.
A buyer can’t tell if a display cabinet will survive a decade of HDB humidity by staring at its finish online; you need to look at the bits nobody photographs. The first check is drawer slides — full-extension metal runners mean you can actually access the entire drawer, a basic luxury many budget cabinets skip. Soft-close mechanisms aren’t just about quietness; they’re a sign the manufacturer considered daily use in a compact space, where a slammed drawer reverberates through the entire 4-room flat. Joinery is another quiet indicator. Dado joints, where a panel slots into a groove cut into the side, create a rigid frame that resists the wobble common in particle-board assemblies glued at the corners. It’s a technique that requires more precision at the factory, and you’ll typically find it in cabinets priced above the $800 mark. The back panel often gets overlooked, but its thickness — a solid 12mm ply versus a flimsy 3mm veneered sheet — telegraphs the overall build integrity; a sturdy back anchors the entire structure and prevents that hollow feel when you lift it. Weight and heft correlate directly with material durability. A cabinet that feels light and hollow when two people manoeuvre it into a Tampines condo lift is likely built with thin panels and minimal internal reinforcement. Conversely, a substantial piece, one that requires genuine effort to shift across your living room floor, usually signals denser wood or thicker composite materials — it’s simply harder to make something heavy feel cheap. That mass also contributes to stability, especially for taller units in homes with active kids or frequent rearrangement. These details collectively answer a practical question: will this piece remain a centre of your living room for the next seven years, or become a nuisance you replace after two? They’re the reasons a $1,200 cabinet from a
local collectionoften outperforms a visually similar $600 import — the investment is in the construction, not just the silhouette.
A common mistake is placing an LED strip dead-centre on a display cabinet's top frame, which casts a harsh shadow across the middle shelf and leaves figurines or ceramics in silhouette. For even illumination, you'll want to position strips along the front edge of each shelf, facing slightly backward; this lights objects from the front and top, minimising shadows behind them. The colour temperature matters, too—a warm white around 2700K to 3000K typically feels more inviting in a living room than a clinical cool white, and it won't distort the hues of your collectibles.
Electrical safety isn't just about avoiding a trip hazard. In Singapore, using non-compliant plugs or transformers not only voids your home insurance but poses a real fire risk in our humid climate. Insist on equipment bearing the SAFETY mark from the Consumer Protection (Safety Requirements) Registration Scheme; it's a non-negotiable for any permanent installation. A cheap, uncertified transformer hidden inside a cabinet can overheat, and you might not notice until it's too late.
Concealing the wiring is what separates a professional-looking install from a DIY job. The goal is to see the light, not the cables. Many well-designed cabinets have integrated channels routed into the back panels or along structural uprights—you can thread the low-voltage wiring through these before final assembly. For retrofit projects, slim, self-adhesive cable raceways painted to match the cabinet interior are a decent fix; just avoid letting wires dangle freely behind glass, as they'll collect dust and draw the eye.
That clean finish extends to the power source. Plan the cabinet's placement relative to a power outlet, ideally behind or immediately beside it, to avoid a long, visible mains cable snaking across your skirting board. If you're undertaking a full living room refresh, this is the moment to consider adding a dedicated, switched outlet inside the cabinet's plinth or an adjacent wall—it's a small upgrade that pays off in daily aesthetics. For those comparing options, integrated lighting solutions are a standard feature in many modern display units, which you can browse alongside other key living room pieces.
A photograph’s colour balance or a screen's calibration can lie, but your own eyes under showroom lighting rarely do. That’s the decisive edge of walking into a Megafurniture showroom at Joo Seng or Tampines — you’re finally judging the thing itself, not its digital proxy. Online, a laminate might look convincingly like walnut; in person, you’ll see the printed grain’s flatness against the depth of a real wood veneer. The warmth of integrated LED lighting, a critical detail for display cabinets, is impossible to gauge from a product page — you need to see if it casts a sterile hospital glow or a soft, gallery-like ambience on your favourite ceramics. You can also test the mechanics that photos ignore. Run your hand along a drawer’s runners; the action should be smooth and silent, not gritty or wobbly. Close a cabinet door and watch how it sits — does it align perfectly with its frame, or is there a slight, irritating gap? These are the small tolerances that separate furniture that feels premium from pieces that feel merely assembled, and they’re only verifiable through hands-on inspection. Perhaps most critical for Singaporean homes is visualising scale. A display cabinet that looks modest online can dominate a 4-room BTO living room, swallowing precious floor space. At the showroom, you can stand beside it, mentally placing it against your own wall, between your TV console and your window. You’ll get a real sense of its bulk, its presence, and how much room you’ll have left to move around it — a calculation far more reliable than trusting dimensions on a page. It turns an abstract purchase into a tangible one. You’re not just buying storage; you’re committing to a large object that will live in your home for a decade. Seeing the exact shade of oak, feeling the heft of a glass shelf, and confirming the soft-close hinge works as promised removes the anxiety of the blind buy. For a considered investment, that confidence is everything, and it’s waiting at their
living room furniture collectionin person.
The final quote for a solid wood display cabinet often doubles once the seller factors in the HDB stairwell surcharge. That’s the reality of navigating narrow lift landings in older estates like Bedok or Tampines; delivery teams will measure your lift’s diagonal clearance, and if your piece won’t fit, you’re paying a premium for manual carry-up. For a 4-room BTO living room, it’s worth confirming dimensions with your retailer upfront—some offer flat-pack options specifically to avoid these fees, though that’s a different kind of labour.
Flat-pack DIY can save you a few hundred dollars, but it’s a trade-off. On-site assembly by the delivery crew means the cabinet is levelled perfectly on your uneven HDB floor, doors are aligned, and any transit damage is their responsibility to rectify immediately. With a flat-pack, you’re on your own with an Allen key and a prayer that the predrilled holes actually line up. For complex units with integrated lighting, professional assembly isn’t just a convenience; it’s often a necessity to validate the warranty on electrical components.
Speaking of warranty, scrutinise the fine print for Singapore’s climate. A standard one-year guarantee might cover manufacturing defects, but it frequently excludes “environmental factors” like humidity-related warping in solid timber or mould growth in poorly ventilated corners. If your display cabinet houses a costly lighting system—LED strips or spotlights—check that the electrical parts are covered separately for at least two years. Many warranties become void if you attempted self-assembly for a unit that required professional installation.
The most common post-purchase headache isn’t a broken shelf; it’s discovering that the beautiful warping on your cabinet door is considered “natural movement” and not a defect. Insist on clear documentation: what exactly is covered, for how long, and what proof of purchase and installation method is required to make a claim. It’s a dry read, but it’s the only thing that stands between you and a $1,800 ornament you can’t use. For a comprehensive look at options that factor in these practicalities, you can browse Megafurniture's collection of living room furniture.
Ultimately, the smoothest deliveries happen when buyer expectations align with logistical realities. Measure your doorway, understand the assembly proposition, and treat the warranty as a key part of the product spec—not just an afterthought.
The most common questions about display cabinets aren't about style — they're about the physical constraints of a Singapore home and the maintenance that follows.
Can a display cabinet fit under an HDB beam? It can, but you'll need to measure the beam's height and depth precisely. Standard cabinet heights often start at 1.8 metres, while some beams drop as low as 2.1 metres from the floor. The solution is usually a custom or modular piece with a reduced top section; you sacrifice some upper storage, but you'll avoid that awkward, unfinished gap that collects dust.
How to light cabinets without a false ceiling? Surface-mounted LED track or puck lights are the typical fix. They run on a slim, low-voltage wire that can be discreetly tacked along the top of the cabinet and down a corner to a nearby plug point. The warm white 2700K–3000K colour temperature is the safe choice — it shows off your ceramics without the sterile glare of a clinic.
Best wood type for east-facing sun? Teak or acacia handle the morning light better than lighter woods like oak or maple, which can yellow unevenly. Even then, consider a UV-filtering window film for that sliding door in your Bedok or Tampines flat; direct sun fades everything eventually.
Cleaning glass shelves in high-dust environments? A microfibre cloth and a 1:10 vinegar-water spray works for weekly upkeep. For the stubborn grime in an open-plan ground-floor unit near a construction site, you'll need isopropyl alcohol to cut through the oily film. The real trick is choosing cabinets with doors — it's the simplest barrier against the constant silt of city living.
That moment just before you confirm an online order is the most critical—it’s when the tape measure and the mood board either align perfectly or expose a fundamental mismatch. For a display cabinet, this final check isn't about style; it's a logistical audit. Cross-reference your room's precise measurements with the cabinet's footprint, not just its listed dimensions. A 160cm-wide unit might fit along the wall in your 4-room BTO, but you'll need to account for the swing of its doors and the depth of its base, especially in narrow walkways common in HDB layouts from Tampines to Jurong West.
Balance the aesthetic statement against the actual functional storage yield. A sleek, frameless glass cabinet makes a striking visual centrepiece, but its interior might only accommodate a dozen curated items. In many homes, that trade-off is worthwhile—the display becomes the feature. But if you need to house a collection of books alongside ceramics, you’ll want to prioritise adjustable shelving and enclosed lower compartments, even if that means a more substantial piece.
Prioritise climate-appropriate materials over transient design trends. Singapore’s humidity is relentless, and a cabinet facing an afternoon sun window in a landed property faces different stresses than one in a centrally air-conditioned condo. Solid rubberwood or treated teak will hold up better over decades than trendy, untreated light woods that might warp. Laminates and engineered woods with proper sealing are pragmatic choices for high-humidity zones; they resist swelling and are easier to maintain in our climate.
That final framework is about reconciling ambition with reality. You might love the idea of a dark-stained statement piece, but in a 12 sqm living-dining area, a lighter oak or ash finish can visually expand the space. It’s a negotiation between the home you imagined and the one you actually live in—where your favourite ceramics are displayed without dusting becoming a weekly chore, and the piece feels anchored, not crammed.
Consider the cabinet’s role in your daily circulation. A protruding corner on a console-depth model can become a shin hazard in a tight walkway from the kitchen.
First, define the cabinet's primary role. For highlighting collectibles, crisp, bright light is key, while for mood lighting, a warm, subtle glow works best. This initial decision between task and accent lighting shapes all other choices. It ensures the illumination complements your room's overall atmosphere.
The light's color dramatically affects display appearance. Warm white (2700K-3000K) enhances wood tones and creates a cozy feel, ideal for traditional decor. Cool white (4000K-5000K) offers a clean, modern look that makes colors pop vividly. Match this to your cabinet's finish and the items inside.
Consider how you will power and operate the lights. Battery-operated kits offer easy installation but require frequent changes. Hardwired or plug-in systems are more reliable for permanent use. Integrating a dimmer switch or smart plug allows you to adjust brightness effortlessly for different occasions.
Strategic placement prevents shadows and glare. For glass shelves, install strips along the front edge to shine downward onto items below. Inside solid cabinets, place strips at the top to wash light down the back wall. This technique creates depth and makes objects stand out clearly.